

How To Build a ToDo App With Django and React. Building a simple ToDo app is one of the first projects you may think of when learning a programming language. Using any single framework like django or laravel or react would work just fine. This project would be most useful for individuals who already have basic understanding of both django and react. It is an easy way of understanding how to create a project using Django for the backend and react for the frontend.
How to use a frontend framework like react with Django for the backend was one of the most exciting concepts for me when i first started web development. Hopefully, at the end of this article you would also have a basic understanding of how it all works too.
Here are some of the tools required for this project
Tools Required
- djangorestframework
- corsheaders
- django
- nodejs
- axios
- bootstrap and reactbootstrap
- VsCode
As we proceed, we’ll be explaining what each of these tools are used for.
Understanding The Logic- What are we Building?
Personally, I feel this part is always left out from most online tutorials. When handling a project, no matter how large or little the project might seem, you need to understand how it is meant to work. Most people just dive into coding when they don’t exactly understand what it is they are building and how they are meant to build it. Let’s take a second and take a look at what we hope to accomplish here;
- Build a ToDo App- We hope to build a ToDo app. At the end of this article, we want to have a fully functional ToDo application. For those that do not know what that is, A ToDo application is an app used to write tasks we hope to accomplish later in the day. It basically helps to remind us things we are meant to do.
No we understand what we want to do, the next question is the “how?”. How do we accomplish said task?
Understanding The Logic- How Do We Build It?
This question has many layers but we’ll stick to the basic then jump right to it. We want to build a ToDo app so how do we do it? In this article we would be building this ToDo app using Django and React. Django is a framework for python while react is a framework for Javascript.
If you’re already familiar with Django, you should know about Django templates. Instead of using the default templating system, react js will be used to build the front end. You cannot have react inside a django work environment, so information will be shared using APIs. That is where the django rest framework comes in. We would build our models using django, build an API for it using restframework then we would interact with our api using react on the frontend.
Enough talking, lets start building step by step.
Download and Install Visual Studio Code
If you have VsCode already installed on your device, go right ahead to the next step. VsCode installation is quite simple to carry out, just visit their website https://code.visualstudio.com/ and download the compatible package for your computer. You can use any IDE of your choice, it will get the job done just the same.
Download and Install Required Frameworks
To use react and django framework on your computer you need to install NodeJS, NPM, Python and Django from their respective sources. Again, we will not go into deep detail on how to install these packages in this article.
Create Your Django Project
Once you successfully install pythin and django, you can go ahead and create your django project. There are many ways we can create this using command prompt but we’ll do this using VsCode.
- create a folder on your desktop and give it your desired name. In this case, we would name ours ToDoApp
- Open your VsCode and open the folder (“ToDoApp”) you just created in your desktop
- Once you’ve gotten opened the file, click on Terminal at the top bar of your VsCode and run “django-admin startapp ToDoApp“. A new folder named ToDoApp will be immediately created with some default python files including manage.py.
- Next step is to create the application folder, make sure your current directory in the terminal has manage.py in it. If it doesn’t you might want to cd into the ToDoApp.
- Next, run “python manage.py startapp base” You can substitute the word base with any name you choose, we just chose “base” for it’s simplicity.
So far, we’ve downloaded python, django, NodeJs and npm. We then went ahead to create a folder and in that folder, we started out ToDoApp project and created a base app. Next we’re going to set up a virtual environment.
Also Read- How to become a programmer in Nigeria
Setting Up Virtual Environment
In Django, you set up a virtual environment so that any 3rd party package you install for your project won’t be installed globally. Rather all packages installed will be strictly for the project yourre working on. It is a tidy way to work and reduces case of conflicts later. Here is how to set up a virtual environment for your django project;
- In your terminal, go to your project directory(where manage.py is located)
- Run the command
python -m venv venvThe second venv can be named basically anything but venv is easier to remember. You can name it todo_env or whatever seems easier for you.
Activating Virtual Environment
Once you set up your virtual environment, you should see the folder right above manage.py. The final step would be to activate virtual environment. You should take note of this part and ensure virtual environment is running because if it isn’t you might encounter errors.
To activate virtual environment, navigate to your project folder and run this command
SourceDir venv\Scripts\activateRemember if you used a different name for your virtual environment folder, that is what you should use in the command above. Once you run the command, your virtual environment should be running without errors.
djangorestframework and django-cors-headers
This step is crucial for setting up the api in the backend. django-cors-headers is a third-party package for Django, that adds support for handling Cross-Origin Resource Sharing (CORS) headers. CORS is a mechanism that defines a policy for allowing web pages to make cross-domain requests, for example, requests from a web page served from domain A to a web API served from domain B.
The django-cors-headers package allows Django to handle CORS headers by adding middleware classes to the Django project and defining the allowed origins, methods, headers, and credentials. By doing so, it enables Django to respond to cross-origin requests in a way that is secure and compliant with the CORS specification.
If you need to handle cross-domain requests in a Django project, django-cors-headers is a useful tool that can save you time and effort in implementing a correct and reliable CORS policy.
Django Rest Framework (DRF) is a powerful and flexible toolkit for building Web APIs. It is a third-party package for the Django web framework and provides a simple and consistent way to build, test, and debug RESTful APIs written using Django.
DRF makes it easy to build, test, and debug RESTful APIs by providing a set of tools and functionalities out of the box, such as: Serialization, Authorization, Authentication, Pagination and Query Parameters.
How to install djangorestframework and django-cors-headers
Go to your terminal and run the following command;
pip install djangorestframework django-cors-headersGo to Settings.py and add the following to installed apps;
# Application definition

INSTALLED_APPS = [
    'django.contrib.admin',
    'django.contrib.auth',
    'django.contrib.contenttypes',
    'django.contrib.sessions',
    'django.contrib.messages',
    'django.contrib.staticfiles',
    'base', #add this (your created app name)
    'rest_framework', #add this
    'corsheaders', #add this
]
in the same Settings.py file, go to middleware and add the line below
MIDDLEWARE = [
    'django.middleware.security.SecurityMiddleware',
    'django.contrib.sessions.middleware.SessionMiddleware',
    'corsheaders.middleware.CorsMiddleware', #Add This
    'django.middleware.common.CommonMiddleware',
    'django.middleware.csrf.CsrfViewMiddleware',
    'django.contrib.auth.middleware.AuthenticationMiddleware',
    'django.contrib.messages.middleware.MessageMiddleware',
    'django.middleware.clickjacking.XFrameOptionsMiddleware',
]

#Then you need to whitelist allowed ip addresses, since we're working with local host we'll whitelist all in this projectCORS_ORIGIN_ALLOW_ALL = True
Creating Model
Now let’s create our model for the to_do list. We’ll keep it simple and use only 3 fields ; the title, description and status of the task.
from django.db import models

# Create your models here.
class Task(models.Model):
    title = models.CharField(max_length=200, null=True, blank=True)
    description = models.TextField(null=True, blank=True)
    completed = models.BooleanField(default=False)

    # def __str__(self):
    #     return self.title
- Title uses charfield model and has a max length of 200 characters, we also set blank and null as true to avoid database errors
- Description uses TextField because it will be used for longer text blocks.
- Completed is used to define the status of the task and is a BooleanField which defines either true or false.
Before we make our, migrations, lets work on the admin.py file. Go to the admin.py file and register your model
from django.contrib import admin
from .models import *

# Register your models here.
class CustomTask(admin.ModelAdmin):
    list_display = ['id', 'title', 'description', 'completed']


admin.site.register(Task, CustomTask)
Here, we imported our model, and created a custom model admin. This helps in ordering the way our models are displayed in our admin panel. “Id” in the list is automatically created by default in django models.
now we make migrations and apply our changes.
python manage.py makemigrationsThen apply changes
python manage.py migrateOnce you apply your changes successfully, you need to create a superuser to be able to access the django admin panel. You run the code below;
python manage.py createsuperuserYou will be prompted to input a username, email and password. Take note of the details you use because that’s what you’ll use to access the admin panel. Once you’ve created a superuser account; you can now start your server.
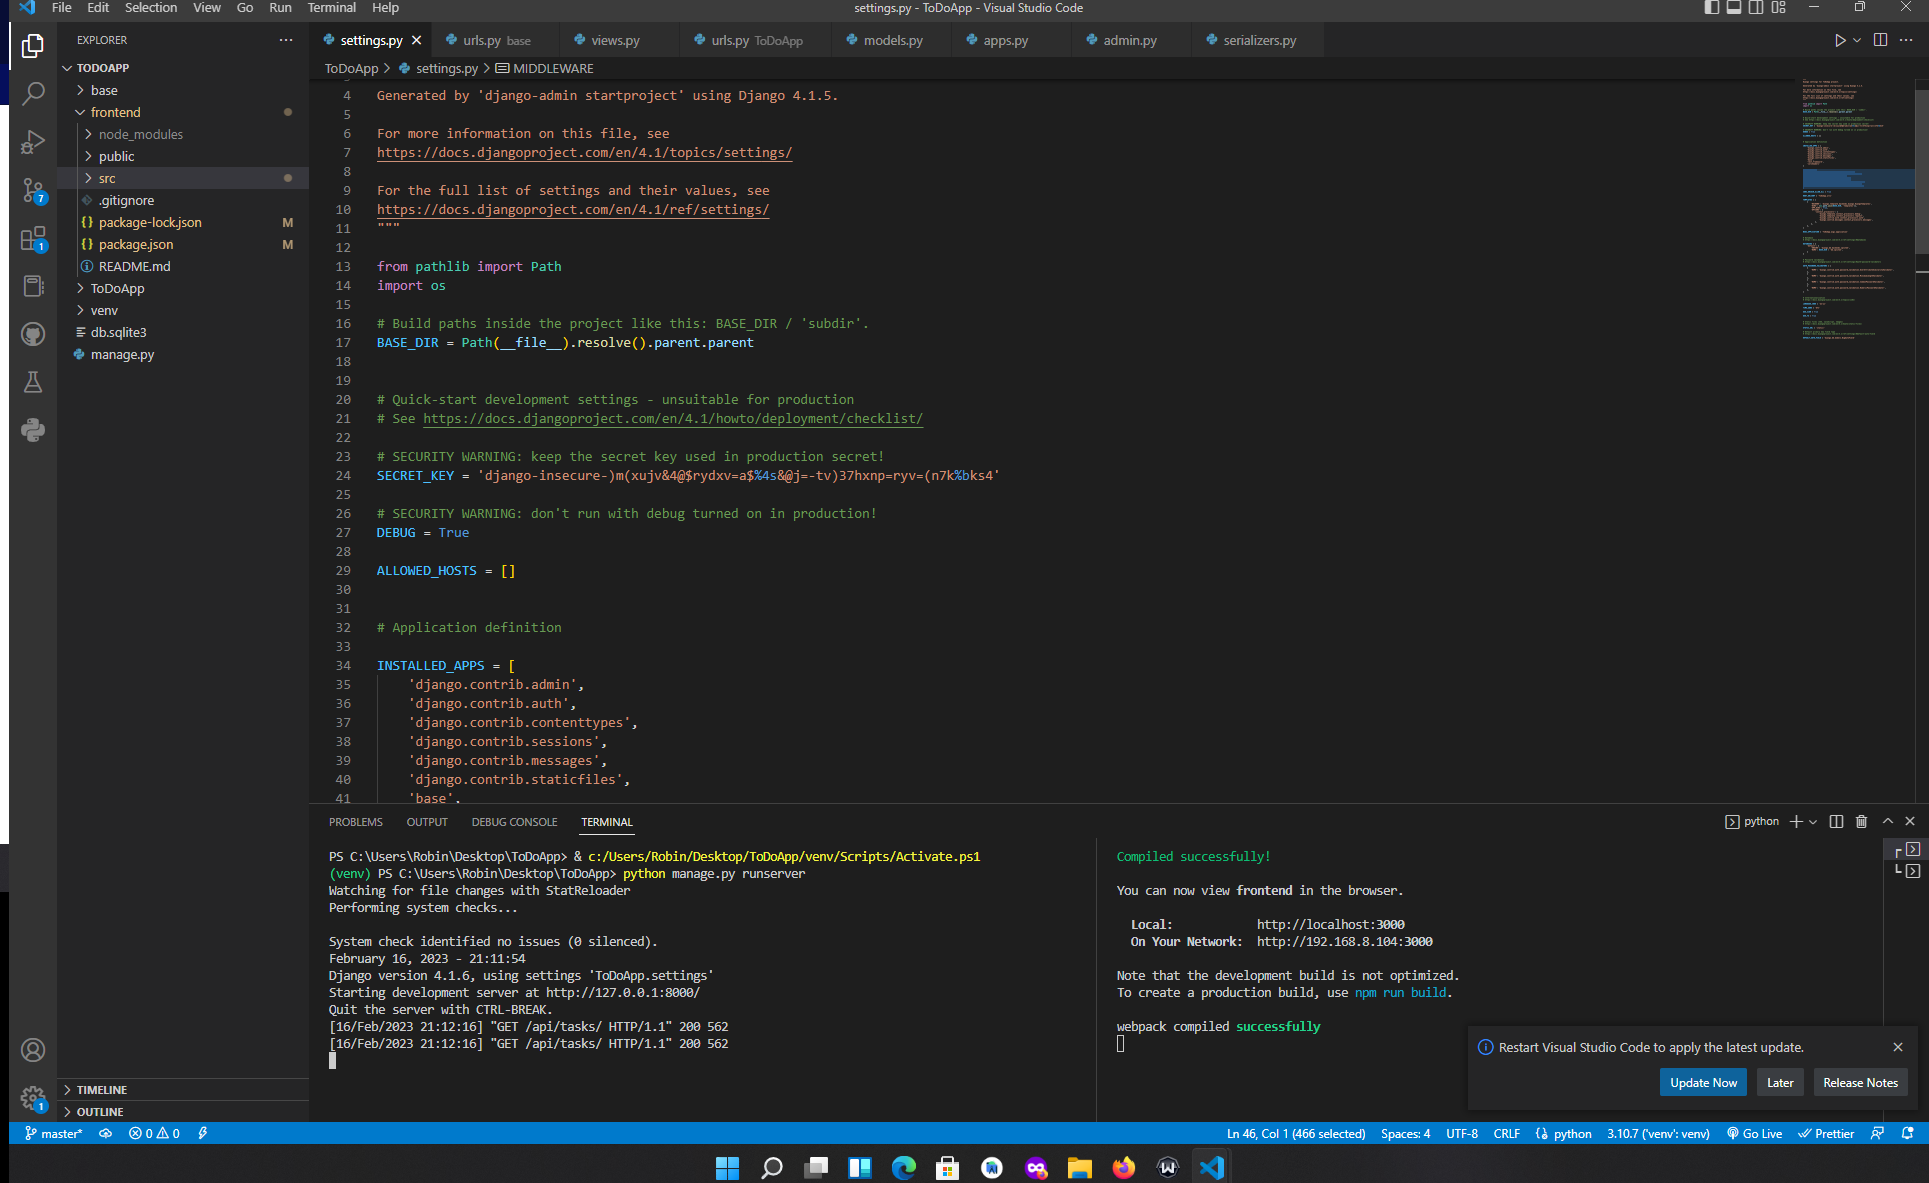
python manage.py runserverIf you did everything correctly, your server should be running at port 8000. Navigate to http://127.0.0.1:8000/admin or http://localhost:8000/admin then login using the superuser details you created.
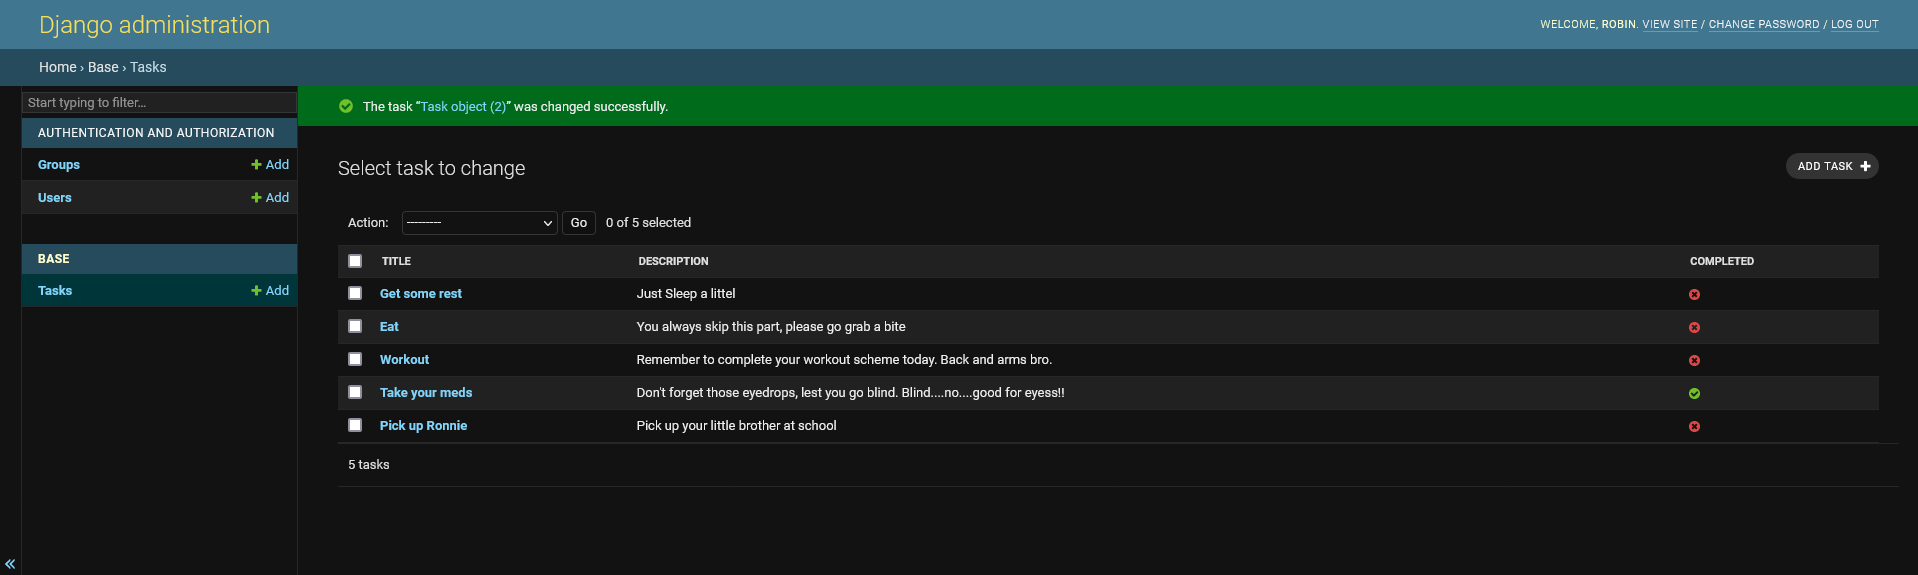
You can Create, Update, Read and Delete new tasks directly from your admin dashboard. Try playing around with it by adding some tasks. If you followed the instructions correctly, you should have something like this in your admin panel when you add tasks.
Building The Api
Creating Serializers
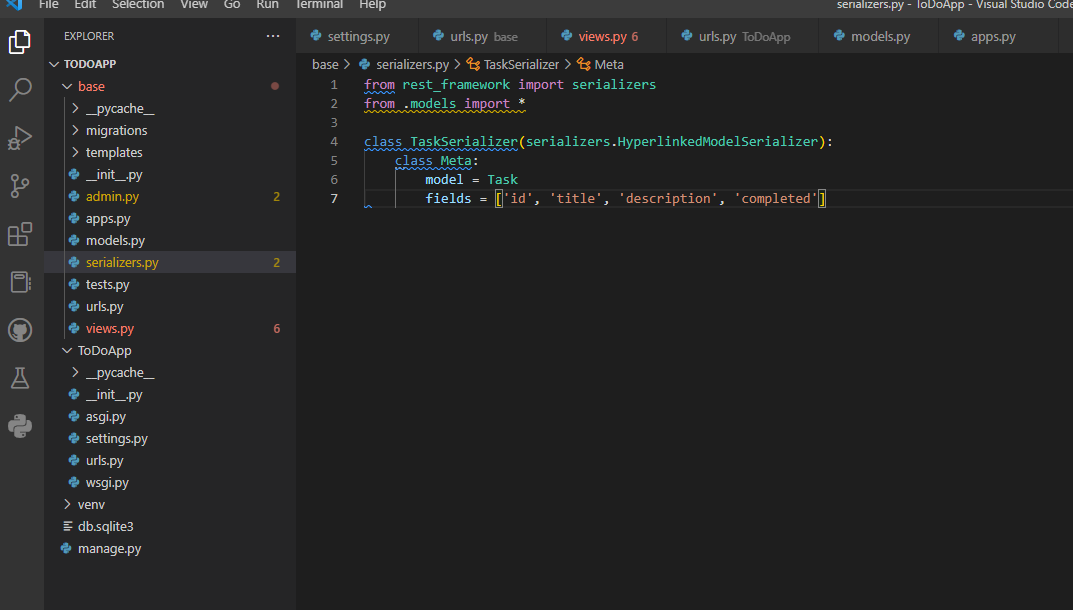
Now, lets begin building our api, In the beginning, we already installed djangorestframework` and cors-headers. We then configured them in our settings.py file. Now let us create our serializers.py file in our application folder. Then write the following code;
from rest_framework import serializers
from .models import *

class TaskSerializer(serializers.HyperlinkedModelSerializer):
    class Meta:
        model = Task
        fields = ['id', 'title', 'description', 'completed']
Your file structure should look somewhat like the image below so far; (ignore the templates folder)
Creating View
Now, let’s create the view for our todo application. In the base/views.py file, create a TaskView class, you can do so using the code below;
from django.shortcuts import render
from rest_framework import  viewsets
from rest_framework import permissions
from .models import Task
from .serializers import TaskSerializer


#create your views here

class TaskView(viewsets.ModelViewSet):
    queryset = Task.objects.all()
    serializer_class = TaskSerializer
The ModelViewSet class automatically generates the necessary view methods for handling CRUD operations, such as list, create, retrieve, update, and destroy, and it also automatically handles serialization and validation of the incoming data.
Once you’re done with your view, navigate to url.py file located in the ToDoApp folder. That is the root url file not the app’s url file. Then write the following code there;
from django.contrib import admin
from django.urls import path, include
from rest_framework import routers
from base import views

router = routers.DefaultRouter()
router.register(r'tasks', views.TaskView, 'tasks')

urlpatterns = [
    path('admin/', admin.site.urls),
    path('api/', include(router.urls)),

]
Congratulations, you have built the API for your task Model. You can now access the API and perform basic CRUD operations.
Navigate to http://127.0.0.1:8000/api/tasks/ to see your complete API response. It should look like this;
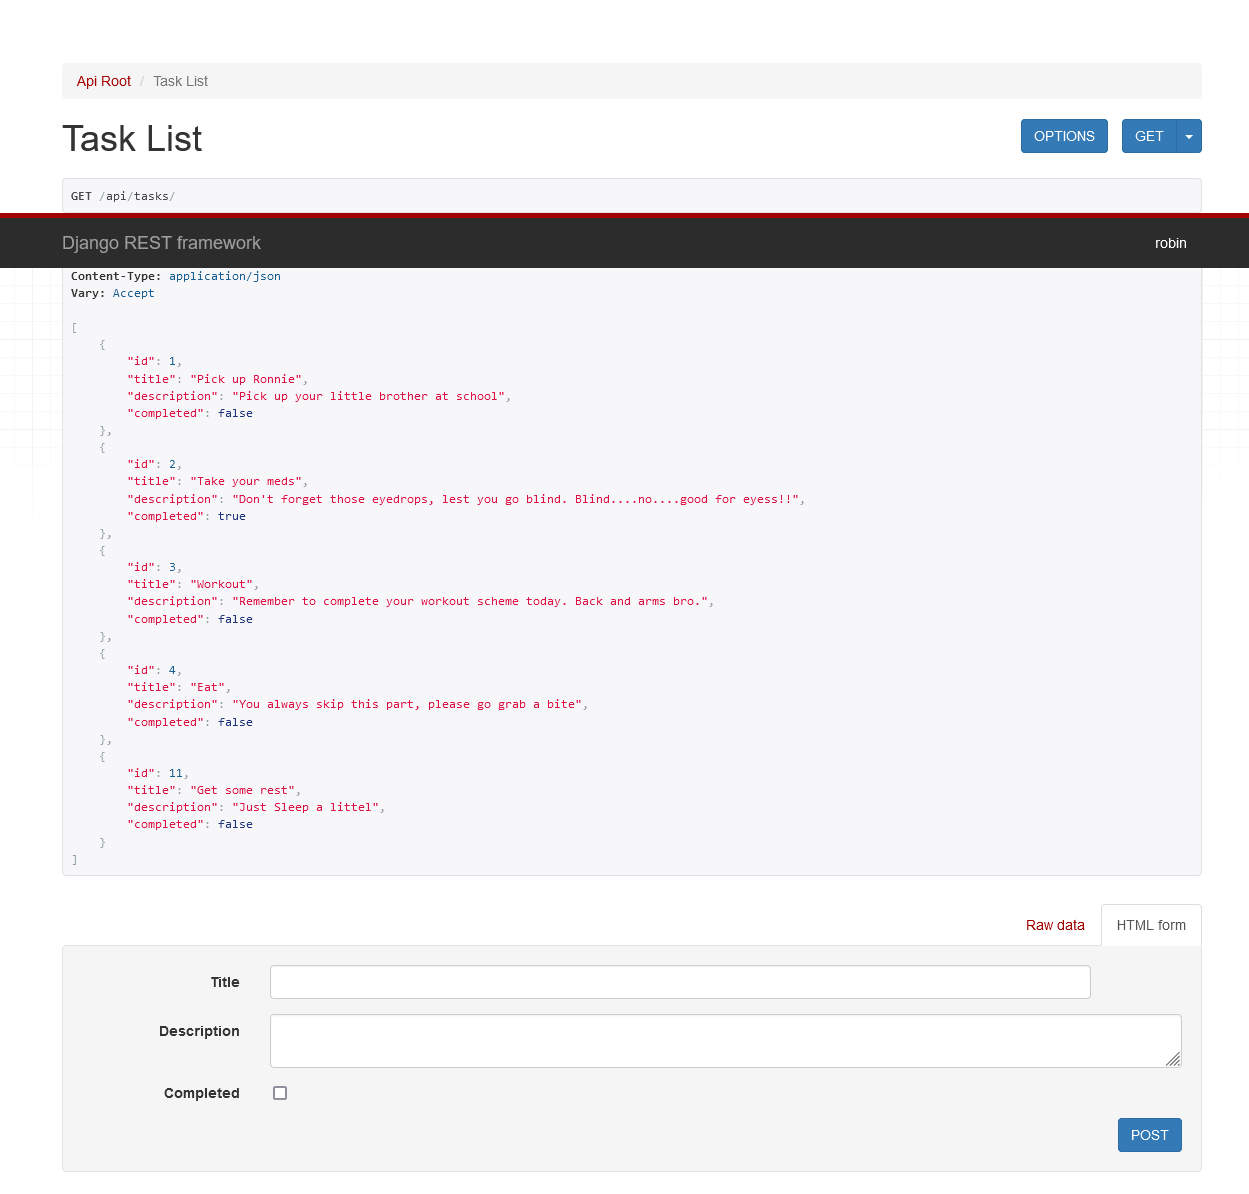
Note, the ModelViewSet allows us create new tasks via API. You can also access individual tasks by adding the id t the url in this format http://127.0.0.1:8000/api/tasks/{id}. If we access the task with the id “3” it should look like this http://127.0.0.1:8000/api/tasks/3/ and the displayed data should look like this;
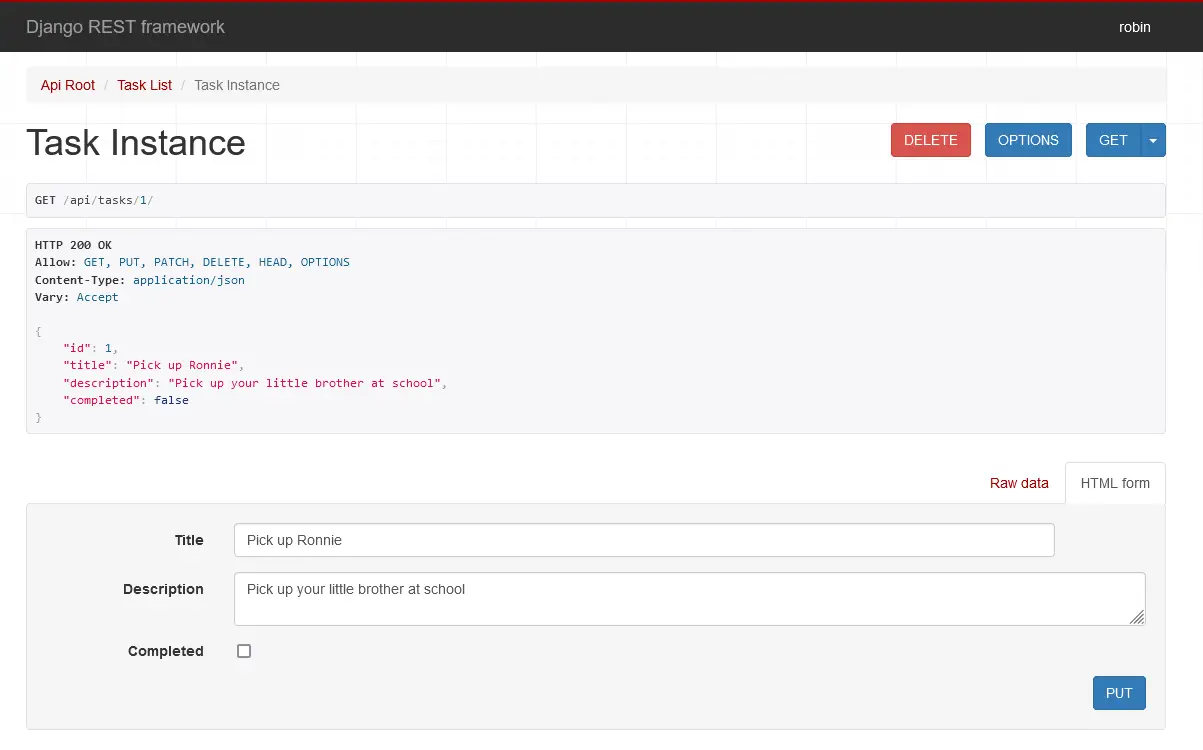
You can also see that the “DELETE” functionality is available for individual tasks. You can try playing with the data here. Attempt updating some fields, adding new ones and deleting some using the CRUD functionality in the API response.
We are officially done with the backend of the ToDo app, now let’s move to setting up the front end with React.
Building the Frontend
This should be fairly simple if you know react and javascript syntax. If you don’t, it might be slightly difficult to follow. I would try to make it as brief and simple as i can. Follow these steps
Create React App in your Project Folder
You can create your react application folder and name it “frontend” by going back to your project root directory then using the code npx create-react-app frontend. Once you do this, it might take a few mins to get your files up and running. Once everything is ready, open a new terminal, go to the frontend directory you just created, and run npm start.
At this point, both django and react servers should be running and your file structure should look like the image above. The good thing about VScode is you can open up multiple terminals withing your project and install packages even when your server is running. Open up a new terminal and then install two important react packages we will be using in the project; axios and bootstrap. Make sure you navigate to your frontend folder then use the code below to install
npm i bootstrap react-bootstrap
npm i axios
Once you’re done with the installation, navigate to your index.js file and import bootstrap. Then create a new folder in your src folder and name it “components” in the new component folder you just created, create a new file and name it axiosAuth.js. Thats where we’ll make our axios calls. It should look like this image below

Consuming the Todo Api Using Axios
Add the following code to your newly created axiosAuth file.
import axios from "axios";

export const getTodo = async (url)=>{
    const getTasks = await axios.get(url).then((response)=>{
        const TaskRes = response.data;
      return TaskRes;
      }).catch(error=> error)
      return getTasks
}

export const addTodo = async (url, todo )=>{
    const addTasks = await axios.post(url, todo, {
    headers: {
      "Content-Type": "application/json"
    }
  }).then((response)=>{ //todopassed after url as payload
    if (response.status === 200){
      const TaskRes = response.data;
    return TaskRes
    }
  }).catch(error=> error)
  return addTasks

}
export const updateTodo = async (url, todoId, todo)=>{
    const updateTasks = await axios.put(`${url}${todoId}/`, todo, {
    headers: {
      "Content-Type": "application/json"
    }
  }).then((response)=>{
    if (response.status === 200){
      const TaskRes = response.data;
    return TaskRes;
    }
  }).catch(error=> error)
  return updateTasks

}
export const deleteTodo = async (url, todoId, )=>{
    const deleteTasks =  await axios.delete(`${url}${todoId}/`, {
    headers: {
      "Content-Type": "application/json"
    }
  }).then((response)=>{
    if (response.status === 200){
      const TaskRes = response.data;
    return TaskRes
    }
  }).catch(error=> error)
  return deleteTasks

}
Then in your App.js, replace the entire content with the following lines of code;
import {Button,Modal} from 'react-bootstrap';
import React, { useState, useEffect } from 'react';
import {getTodo, updateTodo, deleteTodo, addTodo} from "./components/auth/axiosAuth"
import './App.css';


function App() {
  const [show, setShow] = useState(false);
  const [todo, setTodo] = useState("");
  const [Task, setTask] = useState([]);
  const [addModal, setAddModal] = useState(false);
  const [newTodo, setNewTodo] = useState({
    title:"",
    description:"",
    checked: false
  });

  const url = "http://127.0.0.1:8000/api/tasks/"

  useEffect (()=>{
    const Task = async () => {
     await getTodo(url).then((response)=>{
      setTask(response);
      })
    }
   Task()
  }, [])

  const handleClose = () => setShow(false);
  const handleShow = (todo) => {
    setTodo(todo);
    setShow(true);
  }
  const handleAdd = async ()=>{
    await addTodo(url, newTodo).then(()=>{ //todopassed after url as payload
        console.log("successful")
      window.location.reload();

    }).catch(error=>console.log(error))
  }
  const handleAddChange = (e)=>{
    const{name, value}=e.target
    setNewTodo({
      ...newTodo,
      [name]:value
    })
  }
  const handleAddChecked = async (e) =>{
    const{checked}=e.target
    setNewTodo({
      ...newTodo,
      completed:checked
    })

  }

  const handleChange = (e)=>{
    const{name, value}=e.target
    setTodo({
      ...todo,
      [name]:value
    })
  }
  const handleChecked = async (e) =>{
    const{checked}=e.target
    setTodo({
      ...todo,
      completed:checked
    })

  }
  const handleSubmit = async (todoId)=>{
    await updateTodo(url, todoId, todo).then((response)=>{ //todopassed after url as payload
        console.log("successful")
      setTask(response);
      window.location.reload();

    }).catch(error=>console.log(error))
  }
  const handleDelete = async (todoId) => {
    await deleteTodo(url, todoId).then(()=>{
      console.log("task deleted");
      window.location.reload();
    })
  }


  const Taskdetail =()=>(
   Task.filter(item=>item.completed===false).map(singletask=>
    <div key={singletask.id} style={{
      width: "100%",
      justifyContent: "center",


    }}>
      <span style={{
      width: "60%"


    }}><h5>
      {singletask.title}
        </h5></span>
        <span style={{
      width: "100%",
      justifyContent: "space-between",


    }}>

        <Button variant="primary"  onClick={()=>handleShow(singletask)}>Update</Button>
        <Button variant="danger" onClick={()=>handleDelete(singletask.id)}>Delete</Button>


        <hr /></span>
        </div>
        )

  )
  const TaskCompleted =()=>(
    Task.filter(item=>item.completed===true).map(singletask=>
     <div key={singletask.id} style={{


    }}>
 {singletask.completed?"":""}
 <div>
          <h5 style={{
       textDecoration: singletask.completed?"line-through":"",


     }}
          >✅{singletask.title}</h5>
 </div>
          <div> <Button variant="primary"  onClick={()=>handleShow(singletask)}>Update</Button>
          <Button variant="danger" onClick={()=>handleDelete(singletask.id)}>Delete</Button></div>
          <hr />
         </div>)

   )
  // const Tasktitle = Task.map(titlename=>
  //   <h4>{titlename.title}</h4>
  //   )

  const Statuscheck = Task?.length>0 && Task.filter(checkstatus =>
    (checkstatus.completed === false)
  ).length


  return (
    <div >

      <div className='card bg-info'>
      <h2>My ToDo List</h2>
      <Button variant="success" onClick={()=>setAddModal(true)}>Add Task</Button>
      <h5>Hi, You have {Statuscheck} pending tasks</h5>
      <hr />
        <div>
          <div>{Task.length>0?
          <>
          <Taskdetail/>
          <TaskCompleted/>
          </>
          :null} </div>

        </div>
      </div>
      {show &&
      <Modal  show={show} onHide={handleClose}>
      <Modal.Header closeButton>
          <Modal.Title>
          <label htmlFor="Title">Task Title</label>
            <br />
          <input type="text" defaultValue={todo.title} name="title" onChange={handleChange}/>
          </Modal.Title>
        </Modal.Header>
        <Modal.Body>
        <label htmlFor="Title">Task Description</label>
            <br />
          <textarea type="text" defaultValue={todo.description} name="description" onChange={handleChange}/>
          <br/>
          <br/>
          <input type="checkbox" name='completed' defaultChecked={todo.completed} onChange={handleChecked}/>
          {todo.completed?<Modal.Body>completed✔️</Modal.Body>:<Modal.Body>Not Completed❌</Modal.Body>}
         </Modal.Body>

        <Modal.Footer>
          <Button variant="danger" onClick={handleClose}>
            Close
          </Button>
          <Button variant="success" onClick={()=>handleSubmit(todo.id)}>
            Save Changes
          </Button>        </Modal.Footer>
      </Modal>
       }
      {addModal &&
      <Modal  show={addModal} onHide={()=>setAddModal(false)}>
      <Modal.Header closeButton>
          <Modal.Title >
            <label htmlFor="Title">Task Title</label>
            <br />
          <input type="text" value={newTodo.title} name="title" onChange={handleAddChange} />
          </Modal.Title>
        </Modal.Header>
        <Modal.Body>
        <label htmlFor="Title">Task Description</label>
            <br />
          <textarea type="text" value={newTodo.description} name="description" onChange={handleAddChange}/>
          <br/>
          <br/>
          <input type="checkbox" name='completed' checked={newTodo.completed || false} onChange={handleAddChecked}/>
          {newTodo.completed?<Modal.Body>completed✔️</Modal.Body>:<Modal.Body>Not Completed❌</Modal.Body>}
         </Modal.Body>

        <Modal.Footer>
          <Button variant="danger" onClick={()=>setAddModal(false)}>
            Close
          </Button>
          <Button variant="success" onClick={handleAdd}>
            Add Task
          </Button>        </Modal.Footer>
      </Modal>
       }
    </div>
  );
}

export default App;
Let me explain the above code a little;
In the axiosAuth file, we made 4 axios calls;
- get
- post
- put
- delete
These are the allowed methods from our django api. They are also all we need to make our to do app, we get the data from our backend, we post net tasks, we put or edit existing tasks or we can delete them.
In our App.js file, we imported all the axios calls we made in axiosAuth file. We also imported button and Modal from bootsrap which we use to make our interface easy to build and more interactive. useState and useEffect were use call the api, get the state of the data and also helped in manipulating the DOM. Don’t forget to style your card in App.css by adding this line of code to your App.css file;
.card {
    max-width: 550px;
    margin: auto;
    margin-top: 30px;
    text-align: center;
    -webkit-box-shadow: 3px 3px 15px -6px;
    box-shadow: 3px 3px 15px -6px;
}
If you did everything correctly, your output should look like this
Conclusion
Building a todo application with django and react is one of the simplest ways of learning how backend and frontend frameworks interact.The major technologies used were, djangorestframework, django-cors-headers, axios, react-bootstrap, useState, useEffect and bootstrap.
If you have any questions or with to discuss more with the author, you can reach out on robinokwanma@gmail.com.